Creating machine learning models has become one of the most exciting things in the tech industry over the past several years, right? It’s even more exciting when you get to train a high-accuracy model right off the bat without having to iterate over different hyperparameter combinations or techniques. Unfortunately, the reality is that you must go through this entire process and some more to get a good model. This “some more” is often related to how good your data is and how much effort you must put into getting your data in good enough shape before you even feed it into your ML training pipeline.
With data gaining the attention that it deserves in the ML lifecycle, engineers and researchers have become more and more invested in tools and techniques that can assist them with the data-related tasks in an ML project. This is where frameworks like Great Expectations step up and help catch data issues in your project before anyone/anything else does. Great Expectations provides a rich yet simple way of expressing expectations about your data at the table and column levels. The expectations operate as unit tests for data that can be easily created and executed to check if your data meets all the quality requirements defined by you or any stakeholders. With batteries included, Great Expectations provide a comprehensive CLI that helps users profile, validate and document their data and the results of validation jobs.
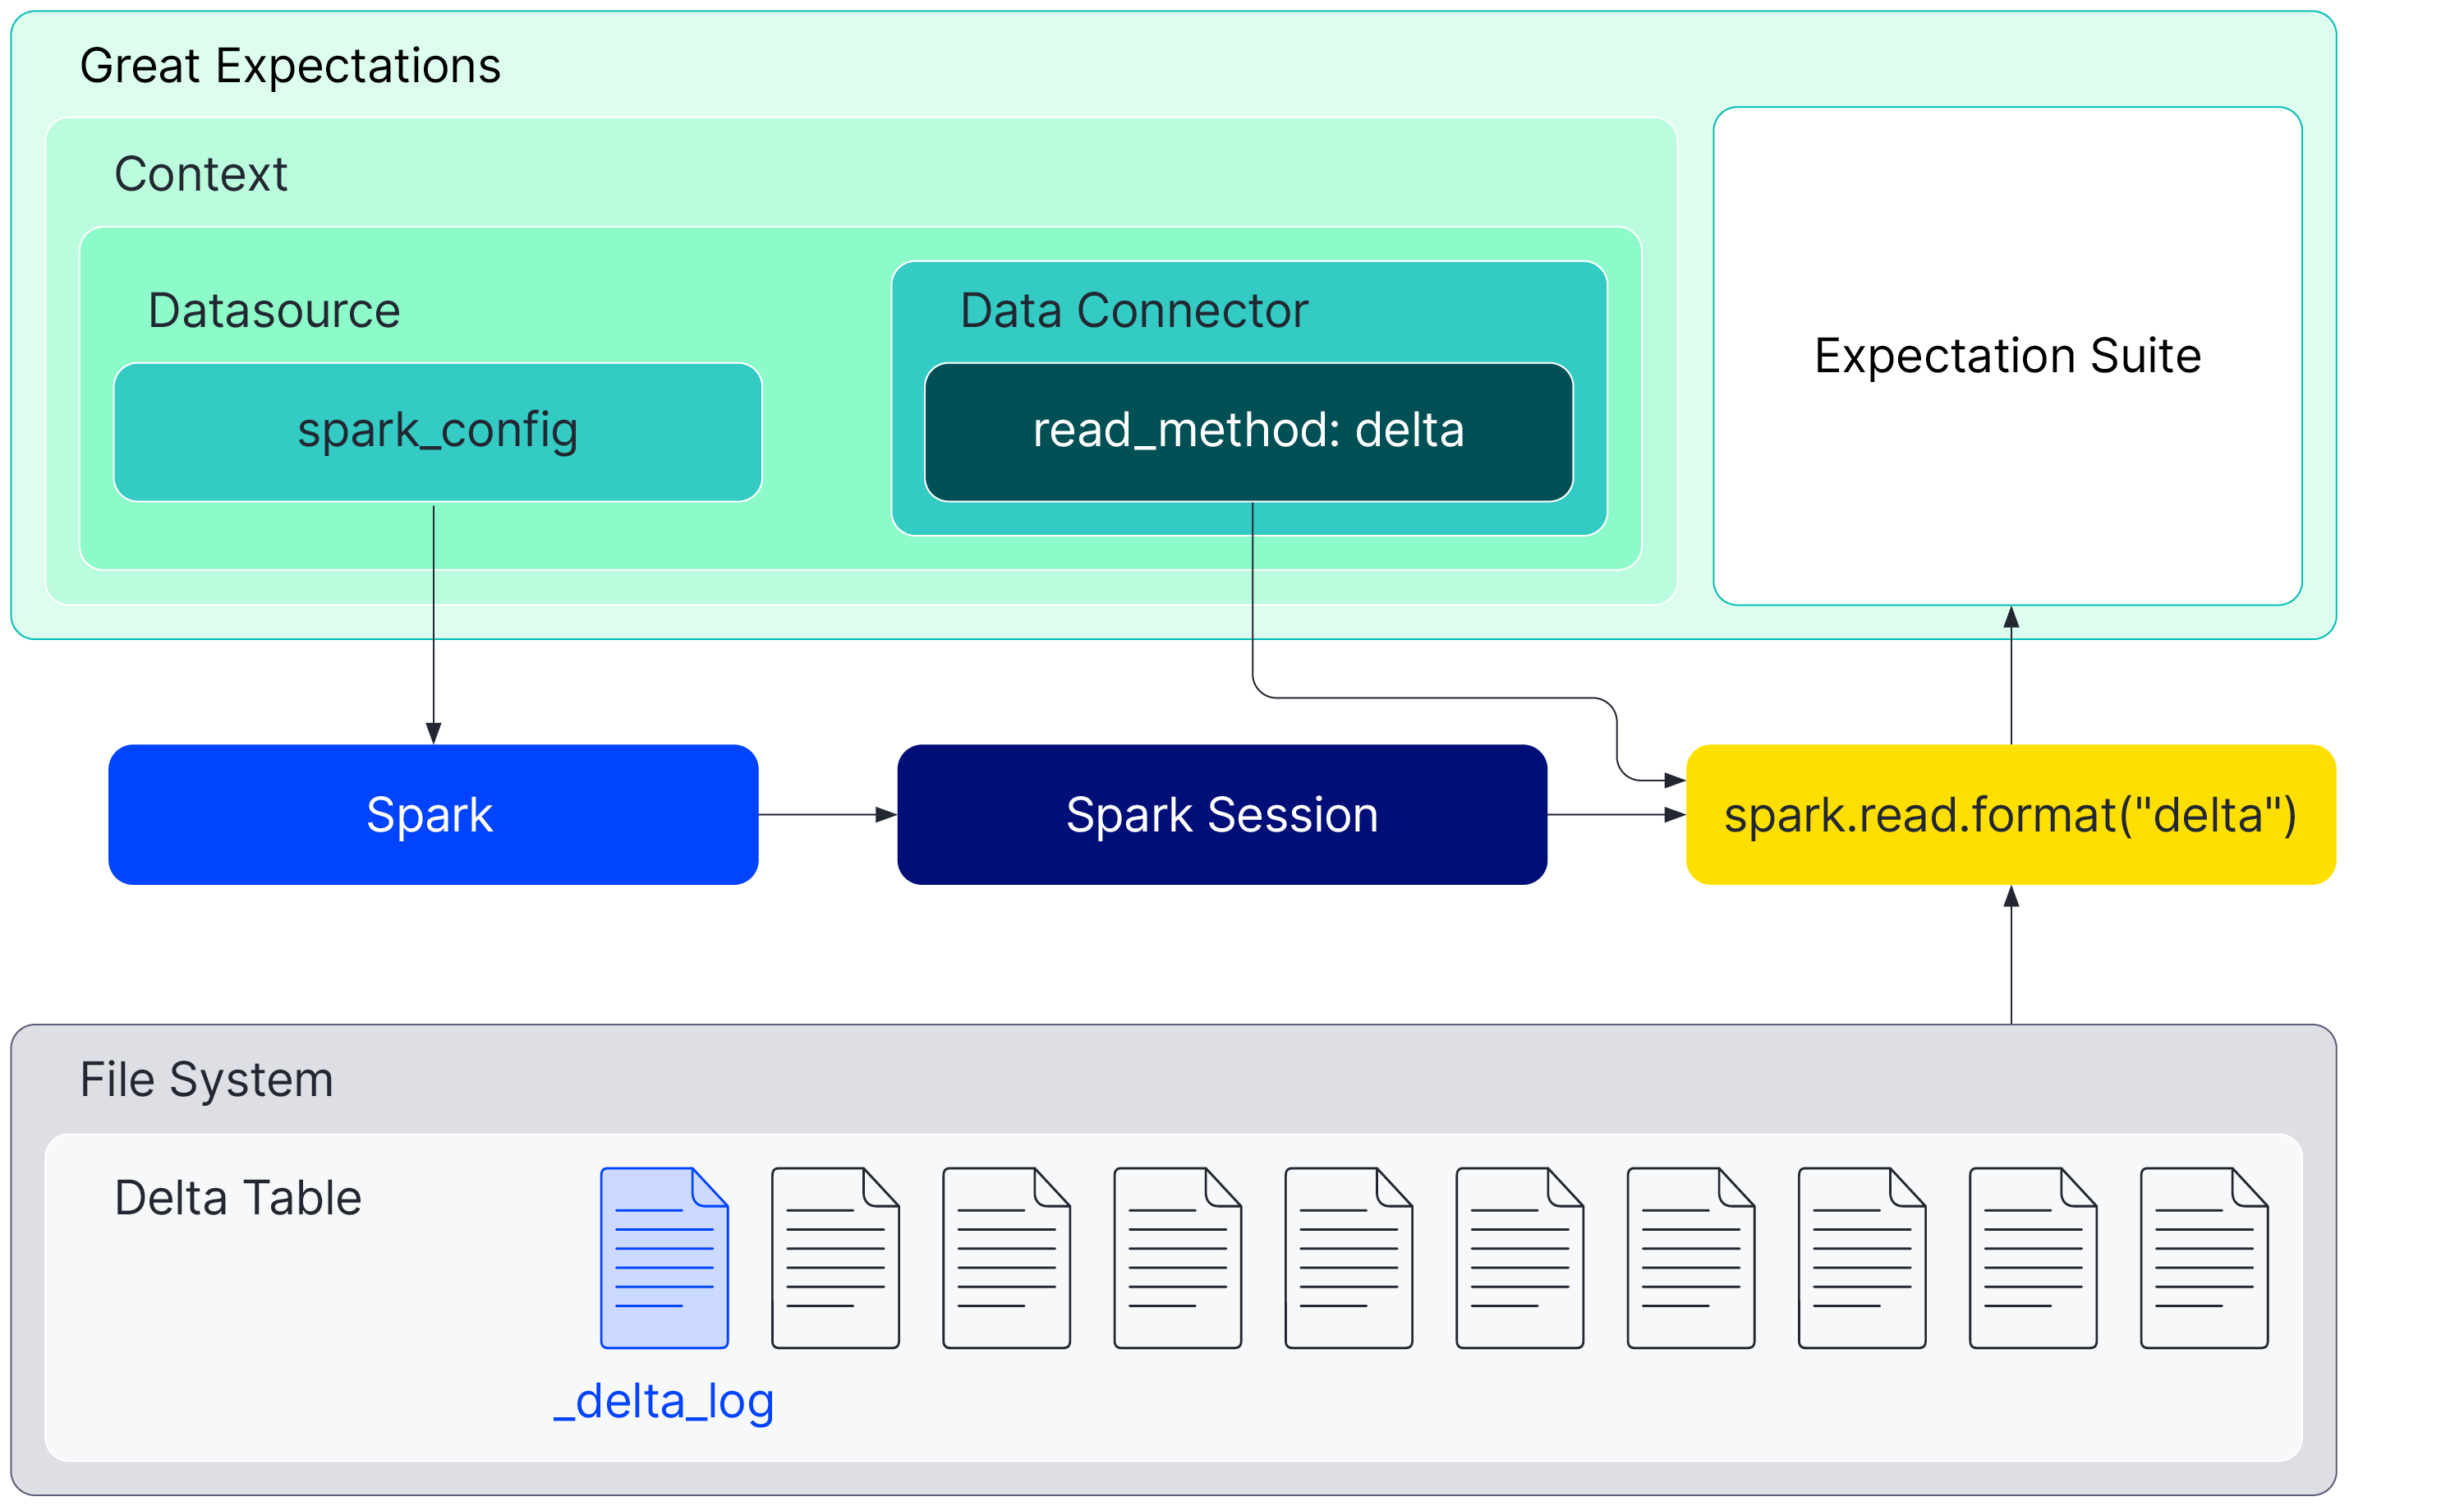
Now, can one use Great Expectations with just any data sources? The answer is a relieving “yes!”, since Great Expectations is backed by Pandas, PySpark and SQLAlchemy, and lets you validate pretty much any data that you would be able to access with any of these three engines. Despite this flexibility and the very thorough documentation provided by Great Expectations, some data sources, like Delta Lake require a bit more custom configurations that are not fully covered in their tutorials. In a nutshell, to validate Delta Tables with Great Expectations, one needs to specify a set of Spark configurations in Great Expectations’ data context and tell Spark to read in the “delta” format. After having these configurations set, Great Expectations and Spark will know what to do to read your Delta Tables and validate your data against suites of expectations.

Since figuring this out took a bit more time than we anticipated, we expect this tutorial will help you save some time and configure your Great Expectations project to read from your local Delta Tables in no time! Now, let’s jump into the technical part and see what your configurations need to look like for you to make Great Expectations read and validate your Delta Tables correctly.
Requirements
Before we jump right into the Great Expectations + Spark + Delta Lake configurations, let’s do a quick check on some requirements.
- We assume you have some familiarity with Great Expectations and already have created your data context with great_expectations init and are ready to create your data source with great_expectations datasource new.
- Great Expectations will make use of Spark to read your Delta Table, so you must have Java installed in your environment and have your JAVA_HOME environment variable set and pointing to your Java installation.
Creating a New Data Source
Assuming you are good with the requirements, we are now ready to look into the configurations of your data source. Let’s use Great Expectations assistant to help us create a Delta Table data source in our data context and fill in most of the configurations necessary to read your Delta Lake data assets from the file system. You can start the assistant by typing the following command in your terminal.
great_expectations datasource newAfter this, the Great Expectations assistant will ask you a few questions to understand what type of connector you’re trying to create so it can do its magic and do most of the heavy lifting for you. Let’s look into what those questions are:
1. Data Source Type
When the Great Expectations assistant asks you what kind of data source you’d like to connect to, choose “Files on a filesystem (for processing with Pandas or Spark)”. This will allow us to read files from our local file system where our Delta Tables are stored.
What data would you like Great Expectations to connect to?
    1. Files on a filesystem (for processing with Pandas or Spark)
    2. Relational database (SQL)
:1
2. Processing Engine
Next, the assistant will ask about the engine to be used to read your files. In this step, we should choose “PySpark” as the processing engine, as the Delta Lake format can be easily accessed via Spark.
What are you processing your files with?
    1. Pandas
    2. PySpark
:2
3. Root Directory of Your Data Path
Last, the assistant will ask for the path of the root directory where your data is stored. For this example, let’s assume that you have your Delta Tables under the /data/delta/ directory.
Enter the path of the root directory where the data files are stored. If files are on local disk
enter a path relative to your current working directory or an absolute path.
:/data/delta/
After these three questions, Great Expectations will create and open a notebook where you can configure the details of your data source, and that’s when we set the necessary Spark configurations to read the Delta Lake format. You will notice that Great Expectations will automatically generate a basic configuration of your data source based on the answers you provided to the assistant.
example_yaml = f"""
name: {datasource_name}
class_name: Datasource
execution_engine:
  class_name: SparkDFExecutionEngine
data_connectors:
  default_inferred_data_connector_name:
    class_name: InferredAssetFilesystemDataConnector
    base_directory: /data/delta/
    default_regex:
      group_names:
        - data_asset_name
      pattern: (.*)
  default_runtime_data_connector_name:
    class_name: RuntimeDataConnector
    assets:
      my_runtime_asset_name:
        batch_identifiers:
          - runtime_batch_identifier_name
"""
print(example_yaml)
Now, all we need to do is add a couple of extra configurations to allow the Spark session behind Great Expectations to read the Delta Lake format. The configuration below highlights the two parts that we will add to our data source configuration. Let’s get into the details of each of them.
example_yaml = f"""
name: {datasource_name}
class_name: Datasource
execution_engine:
  class_name: SparkDFExecutionEngine

  spark_config:
    spark.jars.packages: io.delta:delta-core_2.12:1.2.0
    spark.sql.extensions: io.delta.sql.DeltaSparkSessionExtension
    spark.sql.catalog.spark_catalog: org.apache.spark.sql.delta.catalog.DeltaCatalog

data_connectors:
  default_inferred_data_connector_name:
    class_name: InferredAssetFilesystemDataConnector
    base_directory: /data/delta/
    default_regex:
      group_names:
        - data_asset_name
      pattern: (.*)

    batch_spec_passthrough:
      reader_method: delta
  default_runtime_data_connector_name:
    class_name: RuntimeDataConnector
      assets:
      my_runtime_asset_name:
      batch_identifiers:
        - runtime_batch_identifier_name
"""
print(example_yaml)
First, we added the spark_config dictionary under the execution_engine session to communicate to Spark that we would like to instantiate our Spark session using these properties. These configurations are the same as the ones provided by the official Delta Lake documentation. Note that you can customize your Spark session as much as you need under the spark_config dictionary, which gives users a great deal of flexibility when using Spark as the processing engine in Great Expectations. In this step, you must specify a version of Delta Lake that is compatible with your PySpark/Spark installation. You can check the compatibility between different releases of Spark and Delta Lake.
Now that we made sure that our Spark session can read the Delta Lake format, the second change that we need to apply to this configuration is about making sure that our Spark session will read the Delta Lake format. This can be done by specifying the batch_spec_passthrough property in a data connector and its corresponding reader_method property to be delta. Note that in this example, we’re configuring an InferredAssetFileSystemDataConnector that was already created by Great Expectations, but keep in mind that this extra configuration could be added to other types of connectors supported by Great Expectations as well. This configuration will tell the Spark session instantiated by your data connector what format it should expect when reading batches of data from disk. Since Spark is now configured with the Delta Lake properties in your data source, it will understand the delta format and properly read the logs in your Delta Table.
Once those changes are made, you are ready to proceed and execute the remaining instructions provided in the notebook to test your configuration and add it to your data context. Next, you should be able to create expectations suites to validate your Delta Lake tables using Great Expectation checkpoints. As the creation of an Expectation Suite can involve a more iterative process and will depend on interactions of your own data, we recommend that readers follow Great Expectation’s documentation. Don’t worry; the instructions provided in Great Expectations can be safely used once your data sources and data connectors are properly configured, and we made sure to cover that part above!
Quick Example
In this short example, we show how users can use our newly created Delta Lake data source and an Expectation Suite (that you hopefully already have or have created using Great Expectation’s documentation) to validate data stored in any of your Delta Lake tables. The code snippet below loads Great Expectation’s context and defines the configuration of a checkpoint, which is then instantiated and executed. Note that our Checkpoint configuration contains a “validation” property that defines a “batch_request” and an “expectation_suite_name”, which will define, respectively, how Great Expectations will construct the batch of data to be validated, and the suite of expectations to be executed in that batch of data. In this example, we are specifying that we want to connect to the Delta Table of name “my_delta_table“, which can be accessed through the Datasource named “my_datasource” using the “default_inferred_data_connector_name” data connector. We also specify that we want to run the expectation suite “my_delta_table.warning” available in your context. Make sure that you replace the names of your Delta table, data source, and suite according to your project.
import great_expectations as ge
from great_expectations.checkpoint import Checkpoint

# Loading of Great Expectation's context in memory.
context = ge.get_context()

# Configuration of a checkpoint in Great Expectations to validate data.
python_config = {
    "name": "my_in_memory_checkpoint",
    "config_version": 1,
    "run_name_template": "%Y%m%d-%H%M%S-my-run-name-template",
    "action_list": [
        {
            "name": "store_validation_result",
            "action": {"class_name": "StoreValidationResultAction"},
}, {
            "action": {"class_name": "StoreEvaluationParametersAction"},
        },
        {
            "name": "update_data_docs",
            "action": {"class_name": "UpdateDataDocsAction", "site_names": []},
        },
    ],
    "validations": [
        {
            "batch_request": {
                "datasource_name": "my_datasource",
                "data_connector_name": "default_inferred_data_connector_name",
                "data_asset_name": "my_delta_table",
                "data_connector_query": {"index": -1},
            },
            "expectation_suite_name": "my_delta_table.warning",
        }
    ],
}

# Instantiation of a Checkpoint based on the configuration above.
my_checkpoint = Checkpoint(data_context=context, **python_config)

# Execution of the checkpoint to validate data.
results = my_checkpoint.run()

print(results)
After running this code, you should be able to see the outcome of your data validations on the screen! That’s all; the validation of Delta Lake and Great Expectations can be as simple as that!
Now, let’s pause here and appreciate how amazing it is that in this piece of code, we don’t have to specify any details that are specific to Delta Lake. One of the beauties of Great Expectations is the abstraction of its concepts. For example, once a data source that connects to Delta Tables is configured, everything else in Great Expectations will work through the standard interfaces that abstract the underlying details about the data storage and the methods used to connect to the data.
Note that we provide this simple example for illustration purposes only, and we strongly recommend following the instructions on Great Expectations official documentation for full instructions about the process of validating your data assets.
Hopefully, you are now able to validate your Delta Tables with Great Expectations and will have a great time guaranteeing the quality of your data.
We're Hiring!
RBC Borealis offers a stimulating work environment and the platform to do world-class machine learning in a startup culture. We're growing the team, hiring for roles such as Product Manager, Business Development Lead, Research Engineer - Data Systems and more.
View all jobs